Wallpaper Installation guide, hints & tips.
Tools you will need - Plumb line or spirit level, soft plastic spatula, hard steel spatula, tape measure, pencil, snap blade knife, plastic cutting strip (optional), medium pile roller, paste bucket.
The Wall - Prior to wallpapering it's a good idea to recognise the type of wall i.e porus or non porus, to determin whether a primer is needed prior to installation. Our product is best suited to being hung onto walls which have been painted with emulsion paint.
Uncoated absorbent surfaces, e.g. Plaster, Plasterboard:
Murabond Primer will be required
Non-absorbent surfaces, e.g. solvent based paint such as gloss & eggshell, plasterboard sealers & laminates
Murabond Seal Surface will be required.
1. Preparation - Make sure that the wall is clean and dry. Remove all loose paint, plaster or old paper and fill all holes and cracks with filler, smoothing down the surface when it is set.
2. Start Line and marking out the wall
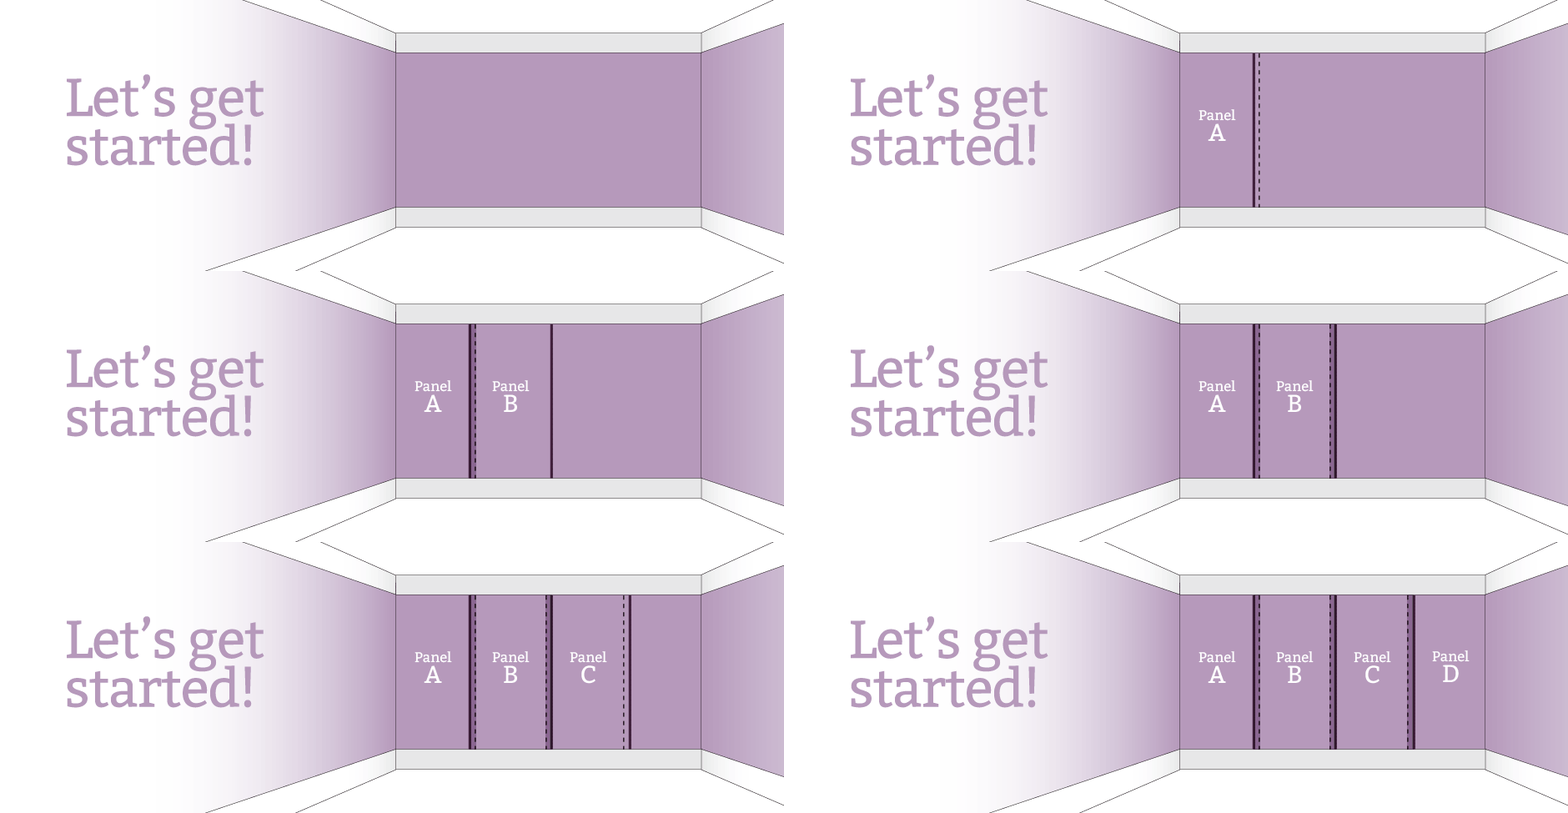
Note that each panel is labelled at the top - Panel A, Panel B, Panel C, Panel D etc. and with their individual widths.
(a) Measure panel A and subtract the extra bleed (indicated on your instructions), using this measurement draw with a plumb line or spirit level, a vertical dashed pencil line from ceiling to floor from the left hand edge of your wall. From here mark the channel width measurement (indicated on your instructions) to the left and draw another vertical line, this channel is your overlap area.
(b) Measure the width of panel B and with this measurement mark another vertical line to the right but taken from the left hand channel line. From this line measure the channel width measurement to the left and draw another vertical line this is your second overlap area.
From here repeat this process with the remainder of your drops (remembering to start from the left hand channel line) using their individual widths until all of your wall is marked out. (see below)

3. Hanging your wallpaper
At this point we would recommend recruiting a friend as your wallpaper may be easier to hang, panel widths can be up to 1200mm wide to reduce the number of joins.
Paste the wall in between the channel lines for each panel, starting with panel B area, using a roller, only paste one panel at a time. (Do not dilute adhesive)
Line the left hand edge of Panel B to the lefth hand line of the first channel and apply using up & down strokes with the soft spatular.
Continue with Panel C, D etc making sure the pattern repeat or image is matching across the two overlap areas so the design continues seamlessly. (Remember do not paste the channels at this point) If the allignment is not correct peel the wallpaper back and re align until correct.
Finish finally with Panel A.
You are now ready to trim your Panels.
4. Trimming
We recommend leaving the adhesive dry for at least 15 mins before trimming.Trim the top and bottom excess of each panel using a hard steel / plastic spatula as a guard and a snap blade knife.

Simple and Perfectly Matched Seams
Overlap Cutting - a technique used to obtain perfectly fitted seams. This is done by overlapping one panel of wallpaper over the other until the image or patterns are perfectly matched. Then a sharp blade is used to cut through both layers. The excess edges are then removed.
To trim the overlap you will need a straight edge and a wallpaper trimming knife. Make a clean, straight, vertical cut through both of the layers at the centre of the overlaps, keeping the blade in position all the way from the top to the bottom, we reccomend snapping off and using a new blade for every cut.
Peel away the waste on the top layer and lift the overlap and peel away the waste on the bottom layer. Paste the channel with a brush & smooth both layers back down, taking care not to squeeze the adhesive out at edges. Any surplus adhesive can be cleaned using a damp clean cloth. The result will be a nearly invisible seam between the panels. The nice thing is that the razor line itself doesn't need to be perfect. Just keep your eye on the middle of the overlap and keep going, slowly.
Continue to install panels and double cut the seams in the same manner until your entire mural is hung, finishing finally with Panel A.
Take time to make sure everything is smoothed properly into place and that all edges are stuck down.